I had a fantastic opportunity to speak at the Walt Disney Parks & Resort (WDPR) Dev Days today. What a great experience!!
As promised, here’s the complete Slide Deck.
I hope everyone enjoyed the event as much as I did!!

Jim Wilson (a.k.a. hedgehogjim)
30+ years as a professional software dev, 17+ years developing mobile solutions, Pluralsight Author, Founder JWHH, LLC
I had a fantastic opportunity to speak at the Walt Disney Parks & Resort (WDPR) Dev Days today. What a great experience!!
As promised, here’s the complete Slide Deck.
I hope everyone enjoyed the event as much as I did!!
One of the challenges when displaying information within a map is determining the right zoom level. The map needs to be zoomed out far enough to allow the user to see a broad set of information but zoomed in close enough to provide enough detail to give the user context.
In our app at Spectafy, getting this right is very important to us. Since the focus of our app is providing user’s with information about things that are going on nearby them, we want to be sure to get that map zoom level just right.
For a user in a large city like San Francisco or New York, a zoom level that shows just a few blocks may show them everything they need. For someone like me who lives in Central Florida, we may need to zoom out a bit further.
To resolve this challenge, we have our app start initially at a reasonably zoomed-in level and then adjust the zoom level dynamically to to include a minimum number of markers.
Determining that appropriate zoom level is pretty straightforward because Google Maps’ zooming changes at a very predictable rate … each reduction in the zoom level (a lower zoom level value is further away) doubles the amount of map that’s visible.
Knowing that, we’re able to determine our perfect zoom level with a method like the following.
float CalculateMarkerInclusiveZoomLevel(
  MapView mapView, List<Marker> markers,
  int minVisible)
{
 var bounds =
   new CoordinateBounds(mapView.Projection.VisibleRegion);
 var initialZoomLevel = mapView.Camera.Zoom;
 var markerInclusiveZoomLevel = initialZoomLevel;

 var count = markers.Count(
   m => bounds.ContainsCoordinate(m.Position));

 while (count < markers.Count && count < minVisible)
 {
   // Each zoom level doubles the viewable area
   var latGrowth =
     (bounds.NorthEast.Latitude - bounds.SouthWest.Latitude) / 2;
   var lngGrowth =
     (bounds.NorthEast.Longitude - bounds.SouthWest.Longitude) / 2;
   markerInclusiveZoomLevel--;

   bounds = new CoordinateBounds(
      new CLLocationCoordinate2D(
          bounds.NorthEast.Latitude + latGrowth,
          bounds.NorthEast.Longitude + lngGrowth),
      new CLLocationCoordinate2D(
          bounds.SouthWest.Latitude - latGrowth,
          bounds.SouthWest.Longitude - lngGrowth));

   count =
     markers.Count(m => bounds.ContainsCoordinate(m.Position));
 }

return markerInclusiveZoomLevel;
}
The above method accepts in a reference to the MapView being displayed, the list of markers on the map, and the minimum number of markers that should be visible to the user.
The method then gets the bounds of the map that’s visible at the current zoom level and what that zoom level is. From there it’s just simple math.
The app counts how many markers are visible within the current bounds. It then keeps doubling the size of the bounds and decrementing the zoom level (lower zoom level is further away) until the desired number of markers is visible within that bounds(either the value of minVisible or all of the markers if the list contains less then minVisible markers).
We can then use the above method similar to the following
// Assumes _mapView is already visible and contains the list of markers in _markers
var newZoomLevel =
  CalculateMarkerInclusiveZoomLevel(_mapView, _markers, 10);
_mapView.Animate(
  CameraUpdate.SetTarget(_mapView.Camera.Target, newZoomLevel));
With this code, the map will now animate to the appropriate zoom level to make at least 10 markers visible.
That easily, we’re now able to give the user just what the want … the right amount of information with the right amount of context.
We’re working on the next major update to our app at Spectafy and as part of that work, we plus–ing a lot of the visual effects.
One of the things we’ve discovered is that there are some scenarios where slowing down the rate we zoom in or out on the map is helpful in drawing the user’s attention to the new information exposed at the new zoom level.
Of course, there’s one problem …
Google Maps on iOS doesn’t expose a way to control the rate of zoom.
The good news is …
Google Maps uses standard iOS animation features to perform the zoom animation. As a result, we can use Core Animation classes to override the rate of zoom.
Here’s the code…
CATransaction.Begin();
CATransiaction.AnimationDuration = 3;
_mapView.Animate(CameraUpdate.SetTarget(new CLLocationCoordinate2D(lat, lng), zoomLevel));
CATransaction.Commit();
In the above code, we simply place the standard Google Maps call that triggers the zoom animation [ _mapView.Animate( … ) ] within a CATransaction, and set the AnimationDuration to 3 seconds within that transaction. That easily we’ve slowed down the animation so that the zoom effect takes 3 seconds.
Try it out … you’ll find that subtle changes in the zoom speed can have a dramatic effect on user experience.
The Xamarin.Auth component is a huge time saver when interacting with services like Twitter and others that require authentication. In most cases, Xamarin.Auth makes authentication as simple as initializing an authenticator and then dealing with success or failure.
As an example, here’s the code to do Twitter authentication with Xamarin.Auth
void DoMyTwitterAuth()
{
  var auth = new OAuth1Authenticator(
    Constants.TwitterConsumerKey,
    Constants.TwitterConsumerSecret,
    new Uri("https://api.twitter.com/oauth/request_token"),
    new Uri("https://api.twitter.com/oauth/authorize"),
    new Uri("https://api.twitter.com/oauth/access_token"),
    new Uri("http://twitter.com"));

  auth.Completed += (sender, e) =>
  {
    if(e.IsAuthenticated)
    {
      var account = e.Account;
      // Do success work
    }
 };

  auth.Error += (sender, e) =>
  {
    // Do Error work
  };

  // iOS
  var ui = auth.GetUI();
  PresentViewController(UI, true, null);
  // Android
  //var ui = auth.GetUI(this);
  //StartActivity(UI)
}
Authenticating against any remote service requires communicating over the Internet which, of course, involves an indeterminate time delay. As a result, the auth.Completed or auth.Error event handlers get called asynchronously after some significant (in computer terms) delay.
We know that writing apps that use traditional asynchronous techniques can be complicated. To deal with this scenario, .NET provides the Task<T> class along with the async and await keywords. With these tools we get to code things using traditional linear programming techniques leaving the asynchronous details to .NET.
If authentication was setup to use Task<T> we could write our authentication code something like this.
async void DoMyTwitterAuth()
{
  try
  {
    var account = await AuthHelper.OAuth1(
      Constants.TwitterConsumerKey,
      Constants.TwitterConsumerSecret,
      new Uri("https://api.twitter.com/oauth/request_token"),
      new Uri("https://api.twitter.com/oauth/authorize"),
      new Uri("https://api.twitter.com/oauth/access_token"),
      new Uri("http://twitter.com"));

    // Do success work
  }
  catch (Exception ex)
  {
    // Do error work
  }
}
That is so much simpler to work with than having to explicitly handle the callbacks in separate methods or lambda expressions.
The problem, of course, is that Xamarin.Auth doesn’t support that async/await programming style.
We can code up an AuthHelper.OAuth1 implementation that translates the Xamarin.Auth callbacks into Task<T> that’ll allow us to use async/await.
Here’s the OAuth1 implementation…
using Xamarin.Auth;
using System.Threading.Tasks;
// other usings elided for clarity

static class AuthHelper
{
  public static Task<Account>OAuth1(
      string consumerKey, string consumerSecret,
      Uri requestTokenUrl, Uri authorizeUrl,
      Uri accessTokenUrl, Uri callbackUrl)
  {
    TaskCompletionSource<Account> tcs =
       new TaskCompletionSource<Account>();

    var auth = new OAuth1Authenticator(
        consumerKey, consumerSecret, requestTokenUrl,
         authorizerl, accessTokenUrl, callbackUrl);

    auth.Completed += (sender, e) =>
    {
      tcs.SetResult(e.IsAuthenticated ?
          e.Account : null);
    };

    auth.Error += (sender, e) =>
    {
      tcs.SetException(e.Exception);
    };

    // iOS
    var ui = auth.GetUI();
    someViewController.PresentViewController(ui, true, null);
    // Android
    //var ui = auth.GetUI(someActivity);
    //someActivity.StartActivity(ui);

    return tcs.Task;
  }
}
With that little helper method, we can now do our authentication code using a simple linear programming style with the help of async/await.
try
{
  var account = await AuthHelper.OAuth1(...);
  // do success work
}
catch(Exception ex);
  // do error work
}
The key to making this work is the TaskCompletionSource. It allows us to easily translate non-Task style asynchronous work to Task-style. Basically it creates a Task<T> instance that can be await’ed on. When the work completes we call the SetResult or SetException methods and the TaskCompletionSource handles the Task signalling details.
We use this technique at Spectafy and it has made our Xamarin.Auth programming so much easier.
Mobile networking introduces connectivity challenges that don’t generally exist in more traditional server-based or desktop-based development. Sure iOS, Android, and Windows Phone provide APIs for checking network availability (I talked about some of the Android network APIs in this discussion of network-based locates) but those APIs don’t tell the whole story.
Often times when working on a mobile device, the Network APIs will report that all is well but a given network call fails anyway (can’t reach host, error reading return value, etc.) … in these cases, often a simple retry will result in a successful call. This can happen anytime with any method call that relies on the network.
What that means is that we need to surround every network call with exception handling and retry logic. With that being the case, a simple call like this…
var byteArray = await
  new HttpClient().GetByteArrayAsync("https://jwhh.com/HedgeHog.gif");
Has to get quite a bit more involved. To make the above call automatically retry in the event of a failure … that simple line of code becomes something like this…
const int MaxTries = 2;
bool success = false;
int tryCnt = 0;
byte[] byteArray;
while(!success && tryCnt++ < MaxTries)
{
  try
  {
    byteArray = await
      new HttpClient().GetByteArrayAsync("https://jwhh.com/HedgeHog.gif");
    success = true;
  }
  catch(Exception ex)
  {
    if(tryCnt < MaxTries)
      Debug.WriteLine("Retrying after error: " ex.Message);
    else
      Debug.WriteLine("Not retrying -  error:" + ex.Message);
  }
}
Basically we’re just wrapping a try/catch block with a retry loop. Nothing incredibly difficult but a lot of extra code to write around every bit of code that interacts with the network.
To make our lives a lot easier, we can leverage the fact that most of the methods that interact with the network in Xamarin/.NET are asynchronous methods that return Task<T> values. This allows us to create a reusable solution with a helper method that accepts a Func<Task<T>> and returns a Task<T>. That helper method handles all of the details of automatically re-executing the call in the event of a failure.
Such a method would allow us to have our network-based work automatically retried just by writing the following…
var byteArray = await TaskHelper.RunWithRetry(() =>
  { return new HttpClient().GetByteArrayAsync("https://jwhh.com/HedgeHog.gif"); }
This wraps the work we want to retry in a lambda expression and passes it to the RunWithRetry helper method that encapsulates the retry details.
So now the question is … what does RunWithRetry look like?
The answer to that is the meat of my post today 🙂
Looking at how to create a reusable solution, I find it’s a bit easier to think in terms of working with the Task<T> capabilities directly rather than using the await behavior in the original retry code I wrote above (await kind’a hides some of the Task<T> details).
Using the Task<T> directly, the code to retry the work in the event of failure might look something like this.
byte[] byteArray = null;
HttpClient().GetByteArrayAsync("https://jwhh.com/HedgeHog.gif")
  .ContinueWith(firstTask =>
{
  if(firstTask.IsFaulted)
  {
    // First try didn't work, so try again
    HttpClient().GetByteArrayAsync("https://jwhh.com/HedgeHog.gif")
     .ContinueWith(secondTask =>
    {
      if(secondTask.IsFaulted)
      {
        // Second try didn't work either
        // Log error and give up
      }
      else
      {
        // Success on second try
        byteArray = secondTask.Result;
      }
    }
  else
  {
    // Success on first try
    byteArray = firstTask.Result;
  }
}
Now that code is even more complicated than the first bit I wrote but we’re beginning to see an opportunity for reusability. Using the Task<T> directly we’re able to determine that the process failed without a try/catch block and could then just repeat the same work we had tried earlier.
We can do some things that makes it reasonably easy to create a reusable solution:
Our solution will be composed of two methods. The first is the one that we will call from within our app code.
public static Task<T> RunWithRetry<T>(Func<Task<T>> func, int maxTries = 3)
{
  return RunWithRetryInternal(func, maxTries - 1,
    new TaskCompletionSource<T>(), Enumerable.Empty<Exception>());
}
This method accepts the function to execute (func) and the number of times to try (maxTries) with a default of 3. The job of this method is to setup the actual work of trying the “func” and pass that into another method that will handle the details.
Here’s the function that handles the details.
private static Task<T> RunWithRetryInternal<T>(
  Func<Task<T>> func, int remainingTries,
  TaskCompletionSource<T> tcs,
  IEnumerable<Exception> previousExceptions)
{
  func().ContinueWith(previousTask =>
  {
    if (previousTask.IsFaulted)
    {
      var exceptions = previousExceptions.Concat(
        previousTask.Exception.Flatten().InnerExceptions);
      if (remainingTries > 0)
        RunWithRetryInternal(func, remainingTries - 1,
          tcs, exceptions);
      else
        tcs.SetException(exceptions);
    }
    else
      tcs.SetResult(previousTask.Result);
  }, TaskContinuationOptions.ExecuteSynchronously);
  return tcs.Task;
}
This method executes the actual work and then checks to see how things went. If the work encountered an error, the function adds the exceptions to a collection and retries the work by recursively calling itself as long as the max number of tries has not been reached. If the max number of tries is reached, then we associate the exceptions with our TaskCompletionSource and exit (the TaskCompletionSource makes us look like a regular task completion to the caller).
If the work does complete successfully (on any of the tries) we then indicate success through the TaskCompletionSource.
Admittedly that code might be a bit to grock at first but we’re basically just creating a generic way to retry Task-based operations. And once we have that method in place, the code you have to write is pretty simple (this is the RunWithRetry call I showed earlier).
var byteArray = await TaskHelper.RunWithRetry(() =>
  { return new HttpClient().GetByteArrayAsync("https://jwhh.com/HedgeHog.gif"); }
More importantly, you’ll find that your application support life gets a lot simpler.
At Spectafy, we experienced a significant drop in the number of network-based errors that we’re reported to the program by adding this type of retry code. This, in turn, creates a far more stable app, happier users, and simpler app support life.
If you’re looking to get started understanding Xamarin, checkout this Free Webcast on Xamarin that I just did for Pluralsight.
If you’d like to a little deeper in Xamarin, checkout my Pluralsight courses on Xamarin…
Keep watching to learn more about Xamarin
Check out my latest article over on Developer.com…
Xamarin is a powerful toolset that brings the rich programming features of .NET and C# to Android and iOS. With Xamarin you are able to create full-featured Android and iOS applications with a shared code base working within a common programming environment. This is part one of a two-part article that walks you through the complete process of using Xamarin to create a simple cross-platform with .NET and C# that runs on both Android and iOS. In part 1, I’ll introduce Xamarin, walk you through the process of creating a cross-platform code library with Xamarin, and guide you through the creation of the Android implantation of the cross-platform app. In part 2, I’ll cover the creation of the iOS implementation…
I’ve been working with Xamarin a great deal the past several months and am increasingly becoming a fan of the product. The ability to leverage the Visual Studio IDE, familiar .NET class libraries, and C#programming language to create both Android and iOS apps provides incredible power.

The beauty of working with Xamarin is that it allows us to share code when doing so makes sense but Xamarin also embraces the unique features of each platform. Xamarin does this by going beyond the many .NET classes that we’re all familiar with to also include .NET classes that expose the features of each platform.
As an example, the features of Android activities are available through a .NET Android.App.Activity class. Similarly, there’s a .NET MonoTouch.UIKit.UITableViewController class that makes the iOS UITableViewController features available. The platform-specific features provided by Xamarin are extremely rich and comprehensive giving us access to most any platform features we’re likely to use.
By having both the standard .NET classes and platform-specific .NET classes we’re able to build our application’s core logic just once, sharing that logic across both platforms, while also having full access to each platform’s unique capabilities and features.
If you’d like to learn more about working with Xamarin, I encourage you to checkout my 2 part course series on cross-platform app development with iOS and Android. Pluralsight just published part 2 of the series this week.


BTW: Although the 2-part series on cross-platform iOS/Android development with .NET/C# is complete there’s still a lot more to content to come. Keep watching for more courses on using Xamarin to create Android and iOS apps.
As you may know, I began digging into Xamarin at the end of last year. It showed a lot of promise as a great way to create cross-platform iOS and Android apps leveraging the existing Visual Studio and C# skills that so many developers have.
When I first started working with it, I did have some initial concerns as I talked about in these 2 blog posts.
I have to say though, once I got past those initial hurdles, things are definitely looking up.
So far I’m doing mostly basic stuff but overall things are going well.
My two main issues are
Neither of these are show-stoppers though.
In the case of connecting to the iOS build server, in most cases restarting Visual Studio takes care of the problem.
For the designer, the Visual Studio designer is workable and if I want to, I can use the Android Studio designer to do the layout work and then just copy it over to the Visual Studio project.
So that’s a long way of saying…
Using Xamarin within Visual Studio is getting a thumbs up so far.
Keep watching as I push on it harder to see how it does as the problem complexity increases.
If you’re interested in doing iOS/Android development with Xamarin, Part 1 of my Pluralsight course series on the topic just went live today…
I’m happy to report that since my previous post, I am now able to build the iOS app without any difficulty. Thanks again to James Montemagno at Xamarin for his help.
BTW: My apologies for the 4-day gap between posting on the issue. I was out of town and didn’t have my Mac with me so couldn’t do the iOS part of the build.
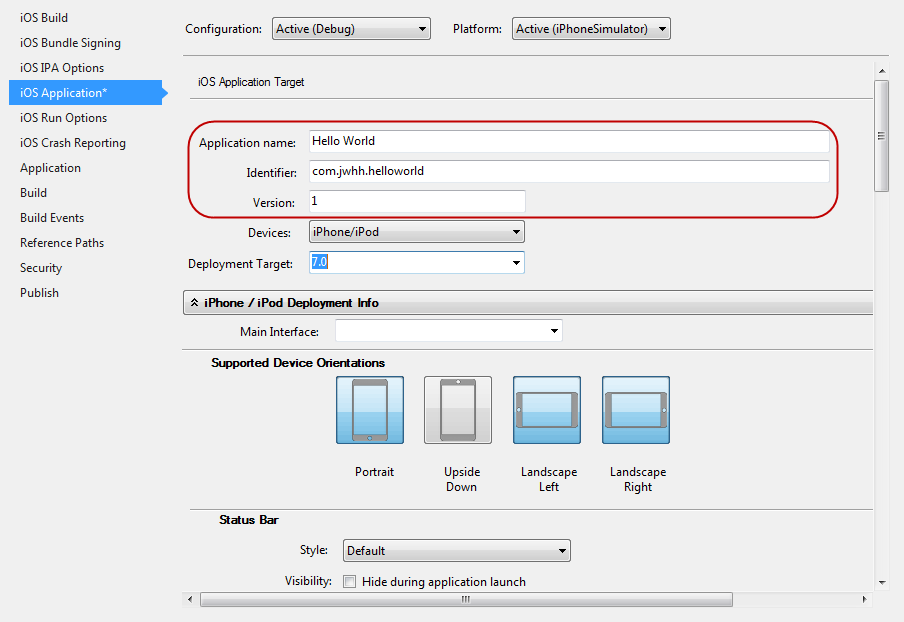
The reason I encountered errors & warnings when building the iOS project is due to the fact that when the wizard generates the project it does not fill in 3 key fields in the project properties: Application Name, Identifier, and Version. The fields are all blank as shown here.

I filled those in with the appropriate values as shown here…
… and all builds well.
One bit of frustration is that I didn’t see anywhere in the Xamarin Hello, iPhone documentation where it said I had to fill these values in for a valid build.
Near the end of the documentation it does mention that one can edit the plist file using property pages. However, the screen shot shows the Identifier and Version fields empty giving one the impression that leaving them blank is OK.
With those values being so important, I would’ve preferred that Xamarin did one of the following (listed in my order of preference).
In fairness, the error/warning messages do indicate that the values need to be set on the property page. It’s just that after the other headaches I was experiencing, seeing an untouched, wizard-generated project fail to build left me a bit discouraged.
IMHO – When working with a brand new environment, its critical that what comes out of the wizard must build without any errors. So often all one is trying to do is verify that the pieces are working and build errors on untouched wizard-generated projects give one the impression that something is wrong. 🙂
One little thing that surprised me is that Visual Studio is not updating the status bar to indicate that a successful build has completed. In the case of a standard Visual Studio project, the status bar displays a message like the following indicating build success.

In the case of my VS solution containing the iPhone project, the status bar does not update with a success message as you can see here.

I’ve had to have the Output window open so that I can see when a successful build completes.
Although I haven’t tried to exhaustively diagnose the cause, the lack of a success message appears to be tied to the fact that the solution contains an iPhone project (Xamarin will often display the Mac build host IP Address in the status bar). When I create a solution containing only an Android project, the build result displays in the status bar as expected.
Just to follow up on the issue I mentioned in my last post about the Xamarin.Android Beta breaking Xamarin.iOS in Visual Studio.
The folks at Xamarin have followed up and let me know that there is an incompatibility between the Xamarin.Android version that is currently in Beta and the production release of Xamarin.iOS. To safely install the Xamarin.Android Beta, I’ll need to install the corresponding Xamarin.iOS Beta … A very reasonable requirement.
You can find the bug report and Xamarin’s response here.
I’m not sure if I’m going to do the Beta installs right now or not. I may just wait for them to reach production release. I’ll keep y’all updated if I do decide to install the Betas.
So everything appears to now be working. I can start really digging into things now.
I do want to give Kudos to the folks at Xamarin…
So far every issue I’ve raised whether in their Forums or on their Bugzilla page has been responded to in a very reasonable time frame. Thanks guys!
