We’ve been talking about Instruction Overlays (or what we at Spectafy call instructables) over several posts (adding instructables and instructable exit animation) this week. Let’s wrap up the week with one more point about showing instructables on Xamarin Android (next week we’ll look at Xamarin iOS).
So far, for simplicity, we’ve be showing our instructable as a single image file. Although simple, this approach runs into issues due to screen sizes differences with Android devices.
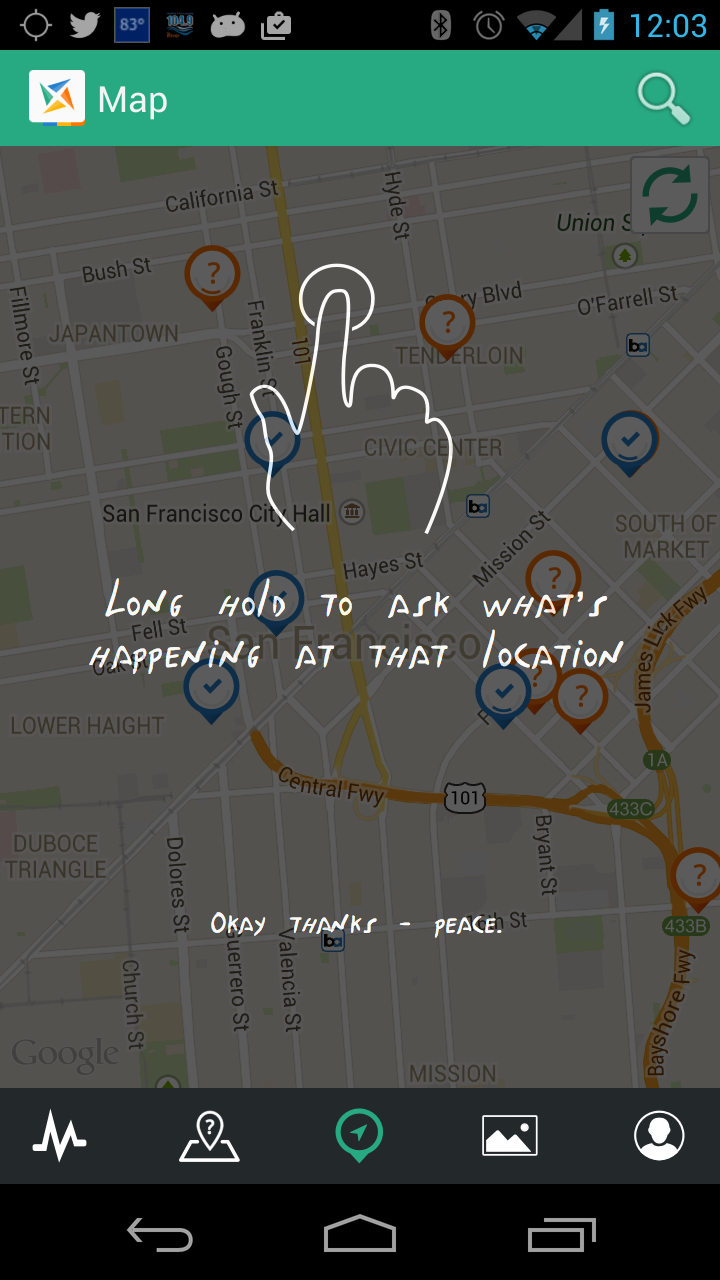
Here’s our instructable on a screen of the desired size (looks good)…

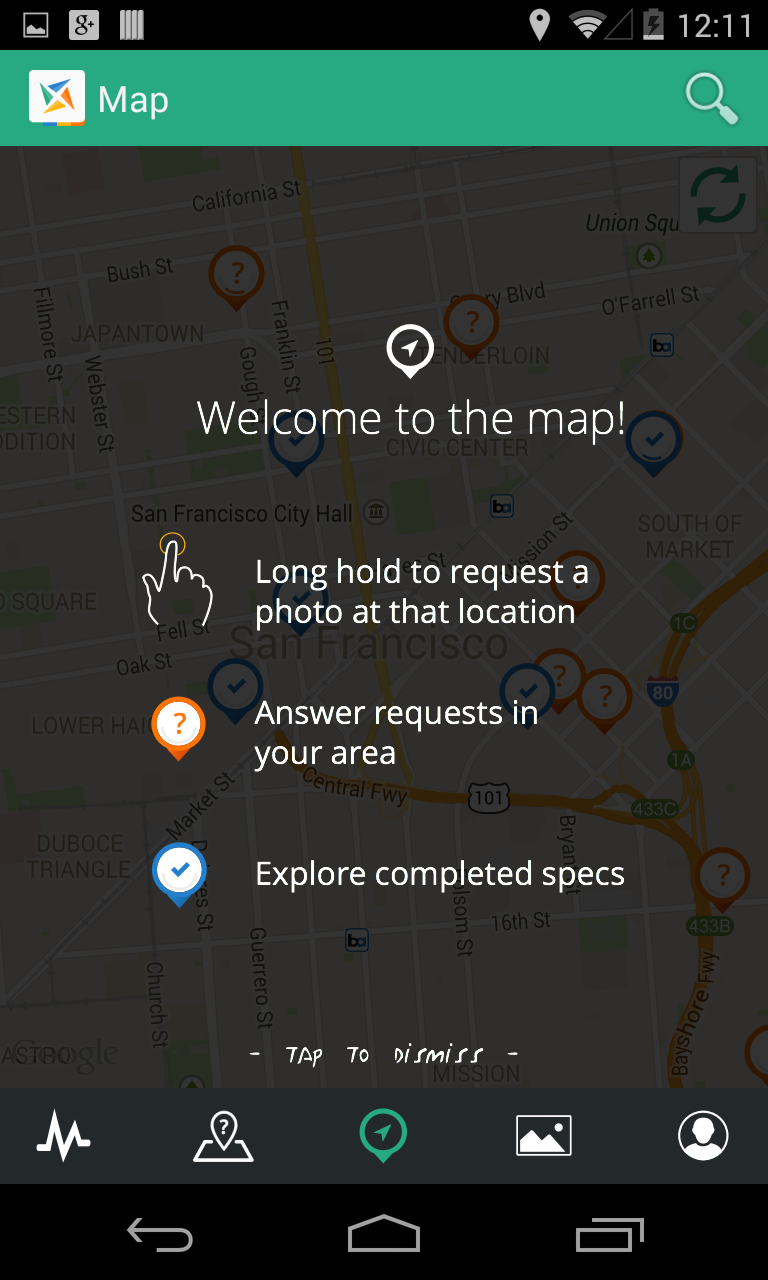
And here it is on a device with a wider screen (not so good — doesn’t cover the right edge)…

One thought is that we might scale or stretch the image but doing so would distort the instructable which we don’t want. It’s important for instructables to be clear and engaging so that our users will want to read them.
Given the wide variety of screen sizes across Android devices, creating a separate image for each screen size would be virtually impossible .. so what do we do?
What we need to do is separate the content of the instructable (the images, words, etc.) from the background. With that, we can keep the content a fixed size, adjust the content positioning, and adjust the background to cover the whole screen.
In the case of the instructable we’ve been looking at this week, we’re now going to need 3 parts.
- A graphic for the main content of the instructable
- A graphic for the “tap to dismiss” message
- A background that will adjust its size without distorting.
For #1 & #2, you’ll need to head back to your graphics person and have them create those images with fully transparent backgrounds. This is also a good time to take a close look at the instructable and see if you might want to make any improvements [ you’re re-doing the graphics anyway 🙂 ].
Here’s our new graphics files … they won’t show well here but if you download them and take a look against a dark background, you’ll be able to see them better.
Graphic #1

Graphic #2

For #3, we can take advantage of Android’s drawable resources. In the drawable folder under the Resources folder, create a file called instructional_background.xml that contains the following…
<?xml version="1.0" encoding="utf-8" ?>
<shape
  android:shape="rectangle"
  xmlns:android="http://schemas.android.com/apk/res/android">
    <solid android:color="#CC000000"/>
</shape>
This file describes a rectangle with a solid fill color of black (000000) that is 80% opaque (CC). The rectangle will draw at whatever size it needs to be.
To create our new screen-size-variation-friendly instructable, we replace the ImageView we created earlier with the following layout description. (In other words, this layout now becomes the last element under the FrameView and you delete the ImageView that was there previously.)
<RelativeLayout
  android:id="@+id/layoutInstructionOverlay"
  android:layout_width="match_parent"
  android:layout_height="match_parent"
  android:visibility="gone"
  android:background="@drawable/instructional_background">

    <!-- Graphic #1 -->
    <ImageView
      android:src="@drawable/map_coaching_main"
      android:layout_width="wrap_content"
      android:layout_height="wrap_content"
      android:id="@+id/imageCoachingMain"
      android:layout_centerInParent="true" />

    <!-- Graphic #2 -->
    <ImageView
      android:src="@drawable/taptodismiss"
      android:layout_width="wrap_content"
      android:layout_height="wrap_content"
      android:id="@+id/imageTapToDismiss"
      android:layout_alignParentBottom="true"
      android:layout_centerHorizontal="true"
      android:layout_marginBottom="10dp" />
</RelativeLayout>
The RelativeLayout element is set to fill the entire screen and has specified our instructional_background drawable as its background. This will give us an 80% opaque black background that fills the screen across all screen sizes and won’t distort.
We’ve then set the main graphic (map_coaching_main) to be centered on the screen.
And finally, our “tap to dismiss” graphic is placed just above the bottom edge of the screen, centered horizontally.
And voila .. we have an instructable that looks good across all screen sizes.
Here’s the narrow-screen device (looking good)…

And the wider-screen device (still looking good)…

We have one other small change to make … We need to be sure that the exit animation we added is applied to the RelativeLayout containing the instructable instead of that single image file we we’re using before.
All we need to do is change the line that did the FindViewById on the ImageView to find the RelativeLayout.
var imageCoachingOverlay = FindViewById<ViewGroup>(Resource.Id.layoutInstructionOverlay);
The animation will now be applied to the RelativeLayout and it’s contents.
And with that .. we have a pretty rockin’ instructable that works across the various screen sizes.
This wraps up our Xamarin.Android discussion of instructables for a bit. Next week we’ll see how to show instructables on Xamarin iOS.