Tag: Android

Programming Stuff

Google Glass not showing in Android ADB utility

Recently my Google Glass arrived … Needless to say, I was excited and ready to start working on building apps for Glass.

I unbox and fire up Glass, go through the initial setup steps, and turn on debug (Settings -> Device Info -> Turn on debug). So far, so good.

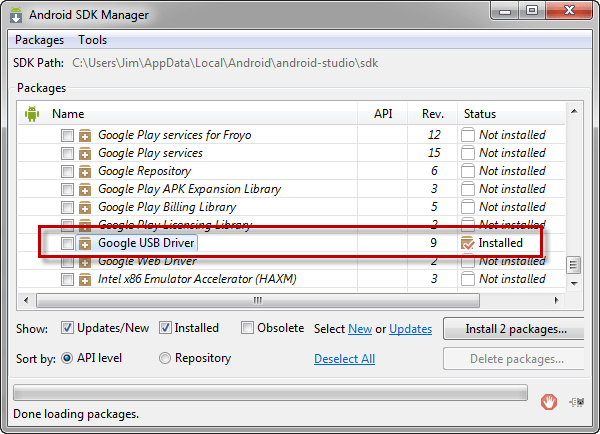
I then walk over to my PC, fire up the Android SDK manager to confirm that I have the latest revision of the Google USB Driver (Rev. 9 at the time of this writing).

GoogleUSBDriver_AndroidSDKManager

I then connect Google Glass to my PC’s USB port and wait for the USB setup window to tell me Glass is ready to use.

The USB setup appears to be going well but just as the setup process is about to finish, my PC displays a message indicating that there were some problems. At first I was somewhat concerned but, things start looking better…

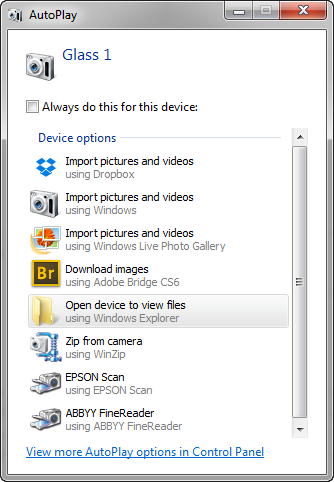
The Auto Play window opens showing options for the Glass device…

GlassAutoPlayWindow

… and Glass 1 is suddenly listed as an option in the Windows File Explorer.

GlassFileExplorer

Using both the Auto Play window and File Explorer I’m able to browse around the device file system. I can even copy files between the Glass file system and my PC file system.

Clearly the USB setup window was mistaken. 🙂

Feeling confident, I open up a command prompt and enter the command to display the list of Android devices currently connected.

adb devices

Which then displays the following.

List of devices attached

Notice that no devices are listed. Clearly the USB setup had not completed successfully … there is a problem with the USB driver.

If ADB doesn’t see that Glass is attached, tools like Android Studio, Eclipse, DDMS, etc. are not going to see the device either. We need to fix this.

Fixing the USB Driver

For the USB Driver to work with Glass, some tweaks need to be made to the USB driver’s android_winusb.inf file (located in [android sdk install folder]\extras\google\usb_driver ). The list of steps to manually modify the file can be found here.

Alternatively, you can download a modified version of the USB driver from AndroidFileHost.com.

If you choose to use this download be extremely careful! USE THIS DOWNLOAD AT YOUR OWN RISK!!

This is not an official USB installation but rather one created by a person who has been kind enough to share it. I’m using this download on my development PC and it’s working great. That said, you still need to be very careful because there’s always the potential for someone to do something malicious.

Once you have the modified USB driver files (whether you manually make the changes or you download them) you can easily update your PC to use the modified USB Driver installation.

  • From the Control Panel, open the Device Manager
  • Locate the entry for Glass. I believe you’ll find it under Other Devices
  • Right-click on Glass and select Update Driver Software
  • When prompted with How do you want to search for driver software? select Browse my computer for driver software
  • In the Browse for driver software on your computer window, browse to the folder that contains the modified driver files. Be sure the checkbox Include subfolders is checked then click Next

You’ll probably receive a warning that the USB driver can’t be verified. As long as you’re confident that you’re dealing with a safe driver installation (either you made the changes to the android_winusb.inf file yourself or you’ve validated that the USB driver files you downloaded are safe)  allow the installation to run.

Once the USB driver installation completes … Your PC is ready to connect to Glass.

You can verify that the USB driver change worked by again running the adb command.

adb devices

But this time, you should see a device listed.

List of devices attached
015DA77204015006 device

And now you’re ready to go … time to start creating those killer apps for Glass !!

Hopefully Google will soon release a USB driver that supports Glass without requiring these extra steps. But until they do, these steps allow us to begin working with Glass right away.

Jim is currently working on an online course for Pluralsight about creating apps for Glass with the Glass Development Kit.  That class should be available at the end of April 2014.

Remember though that developing native apps for Glass requires a solid understanding of Android app development so checkout Jim’s many Android programming courses and cross-platform iOS/Android programming courses at Pluralsight.

Programming Stuff

Cross Platform iOS/Android with Visual Studio and C# (Xamarin) Series Complete

I’ve been working with Xamarin a great deal the past several months and am increasingly becoming a fan of the product. The ability to leverage the Visual Studio IDE,  familiar .NET class libraries, and C#programming language to create both Android and iOS apps provides incredible power.

Xamarin_iOS_Android

The beauty of working with Xamarin is that it allows us to share code when doing so makes sense but Xamarin also embraces the unique features of each platform. Xamarin does this by going beyond the many .NET classes that we’re all familiar with to also include .NET classes that expose the features of each platform.

As an example, the features of Android activities are available through a .NET Android.App.Activity class. Similarly, there’s a .NET MonoTouch.UIKit.UITableViewController class that makes the iOS UITableViewController features available. The platform-specific features provided by Xamarin are extremely rich and comprehensive giving us access to most any platform features we’re likely to use.

By having both the standard .NET classes and platform-specific .NET classes we’re able to build our application’s core logic just once, sharing that logic across both platforms, while also having full access to each platform’s unique capabilities and features.

If you’d like to learn more about working with Xamarin, I encourage you to checkout my 2 part course series on cross-platform app development with iOS and Android. Pluralsight just published part 2 of the series this week.

CrossPlatformiOSAndroidVSCSharpPart1_WithLogo

CrossPlatformiOSAndroidVSCSharpPart2_WithLogo

BTW: Although the 2-part series on cross-platform iOS/Android development with .NET/C# is complete there’s still a lot more to content to come. Keep watching for more courses on using Xamarin to create Android and iOS apps.

Programming Stuff

4 Reasons to use Android Fragments (or What Time is it?)

Although Fragments have been part of the Android API for nearly three years, I find that developers still often struggle to understand their value and purpose.

A common explanation of Fragments, and one I sometimes even use myself, is:

Fragments group user interface components and their associated logic.

That explanation is accurate. However, if someone is struggling with how to apply Fragments in a practical sense, that explanation is about as useful as teaching someone how to tell time by explaining the finer details of Swiss watch construction … sometimes you just want to know what time it is…

Read the rest of my post over on blog.pluralsight.com ]

Programming Stuff

iOS/Android/VisualStudio/C#/Xamarin – It’s Looking Up

As you may know, I began digging into Xamarin at the end of last year. It showed a lot of promise as a great way to create cross-platform iOS and Android apps leveraging the existing Visual Studio and C# skills that so many developers have.

When I first started working with it, I did have some initial concerns as I talked about in these 2 blog posts.

I have to say though, once I got past those initial hurdles, things are definitely looking up.

So far I’m doing mostly basic stuff but overall things are going well.

My two main issues are

  1. Visual Studio seems to occasionally have difficulty attaching to the iOS build server
  2. The Visual Studio Android UI designer doesn’t work as well with RelativeLayout as Android Studio does

Neither of these are show-stoppers though.

In the case of connecting to the iOS build server, in most cases restarting Visual Studio takes care of the problem.

For the designer, the Visual Studio designer is workable and if I want to, I can use the Android Studio designer to do the layout work and then just copy it over to the Visual Studio project.

So that’s a long way of saying…

Using Xamarin within Visual Studio is getting a thumbs up so far.

Keep watching as I push on it harder to see how it does as the problem complexity increases.

If you’re interested in doing iOS/Android development with Xamarin, Part 1 of my Pluralsight course series on the topic just went live today…

CrossPlatformiOSAndroidVSCSharpPart1_WithLogo

Programming Stuff

Lambda Expressions in Android Studio

I’m often asked by students from my Android courses as to how I’m able to use Lambda expressions like the following in my Android programs.

Lambda Code Folded

The short answer is: I’m not able to use them. 🙂 What I typed was the following.

Lambda Expanded

The Lambda expressions appear in the editor due to a feature of Android Studio called “Code Folding”.

Android Studio does this sort’a thing in a number of scenarios. You can tell the Lambda expression is a result of code-folding by the highlight that appears over the folded portion of code.

You can also easily identify that the Lambda expression is a result of code folding because the editor will display a plus-sign to the left of the statement. You can view the full, original statement by clicking on the plus sign.

Lamba expression substitution is controlled by the following value in the Android Studio Settings dialog.

Code Folding Settings

As this is my first post of 2014, let me take this opportunity to wish everyone … Happy New Year!!

Programming Stuff

iOS/Android/VisualStudio/C#/Xamarin – Getting a Working iOS Build

I’m happy to report that since my previous post, I am now able to build the iOS app without any difficulty. Thanks again to James Montemagno at Xamarin for his help.

BTW: My apologies for the 4-day gap between posting on the issue. I was out of town and didn’t have my Mac with me so couldn’t do the iOS part of the build.

The reason I encountered errors & warnings when building the iOS project is due to the fact that when the wizard generates the project it does not fill in 3 key fields in the project properties: Application Name, Identifier, and Version. The fields are all blank as shown here.

iOSAppProperties

I filled those in with the appropriate values as shown here…

iOSAppPropertiesCompleted

… and all builds well.

One bit of frustration is that I didn’t see anywhere in the Xamarin Hello, iPhone documentation where it said I had to fill these values in for a valid build.

Near the end of the documentation it does mention that one can edit the plist file using property pages. However, the screen shot shows the Identifier and Version fields empty giving one the impression that leaving them blank is OK.

With those values being so important, I would’ve preferred that Xamarin did one of the following (listed in my order of preference).

  1. Prompt for the values in the project wizard
  2. Default the fields to some reasonable value

In fairness, the error/warning messages do indicate that the values need to be set on the property page. It’s just that after the other headaches I was experiencing, seeing an untouched, wizard-generated project fail to build left me a bit discouraged.

IMHO – When working with a brand new environment, its critical that what comes out of the wizard must build without any errors. So often all one is trying to do is verify that the pieces are working and build errors on untouched wizard-generated projects give one the impression that something is wrong. 🙂

Build Success/Failure

One little thing that surprised me is that Visual Studio is not updating the status bar to indicate that a successful build has completed. In the case of a standard Visual Studio project, the status bar displays a message like the following indicating build success.

VSProjectShowBuildResult

In the case of my VS solution containing the iPhone project, the status bar does not update with a success message as you can see here.

XamarinStatusNoBuildResult

I’ve had to have the Output window open so that I can see when a successful build completes.

Although I haven’t tried to exhaustively diagnose the cause, the lack of a success message appears to be tied to the fact that the solution contains an iPhone project (Xamarin will often display the Mac build host IP Address in the status bar). When I create a solution containing only an Android project, the build result displays in the status bar as expected.

Xamarin.Android Beta Issue

Just to follow up on the issue I mentioned in my last post about the Xamarin.Android Beta breaking Xamarin.iOS in Visual Studio.

The folks at Xamarin have followed up and let me know that there is an incompatibility between the Xamarin.Android version that is currently in Beta and the production release of Xamarin.iOS. To safely install the Xamarin.Android Beta, I’ll need to install the corresponding Xamarin.iOS Beta … A very reasonable requirement.

You can find the bug report and Xamarin’s response here.

I’m not sure if I’m going to do the Beta installs right now or not. I may just wait for them to reach production release. I’ll keep y’all updated if I do decide to install the Betas.

Carrying On

So everything appears to now be working. I can start really digging into things now.

I do want to give Kudos to the folks at Xamarin…

So far every issue I’ve raised whether in their Forums or on their Bugzilla page has been responded to in a very reasonable time frame. Thanks guys!

Programming Stuff

iOS/Android with Visual Studio/C# Using Xamarin, First Impressions: A Little Frustrating

I’ve been wanting to dig into using Xamarin to do iOS/Android development in Visual Studio/C# for a while now. So finally had a chance to start looking into it closely.

Update: After you read this post, checkout the follow up.

I now have everything setup and running. I must admit that creating my first Android and iOS projects was not as a satisfying has I had hoped. There’s a bit of flaky behavior in the Android UI designer and the wizard generated projects for both Android and iOS have problems.

Let’s look at the Android side of things first.

Android Designer

The initial problems I ran into were tied to unexpected UI designer behavior I encountered when it was first opened.

AndroidDesignerIssues_Annotated

  1. The “Alternative Layouts” button, which is a really cool feature that lets one manage different device layouts more easily, didn’t work at all. Clicking on it did nothing.
  2. The other buttons across the top allow one to manage the UI layout in different environments. As you can see some of those buttons are too small for their labels. There also some missing.
  3. I was expecting buttons on the bottom-left of the designer to allow me to toggle between the design-view and the XML-view but they aren’t there.
  4. Finally the label of the button on the device design-surface is showing the name of the string resource ‘@string/Hello’. It should be displaying the actual value.

The first two issues are easily resolved by simply taking some action that causes the design window to resize: explicitly resizing it, hiding/showing the toolbox, etc.

It turns out that the design-view/XML-view toggle buttons are not supported for VS2013 in the current stable release of Xamarin.Android (4.10.1), although they are supported in earlier VS versions and in Xamarin Studio (Xamarin’s stand-alone IDE). I checked around and found that the beta version of Xamarin.Android 4.10.2 does include support for the toggle buttons so I decided to install the beta.

When I installed the beta, it did indeed add the toggle buttons. It also fixed the first two issues I mentioned BUT

… it completely broke iOS support in Visual Studio 2013 (we need to keep in mind that Xamarin.Android 4.10.2 is still in beta). I could no longer open or create iOS projects (remember it’s Android support that I updated). Unfortunately reinstalling Xamarin.IOS did not fix it. I ultimately had to completely uninstall all of Xamarin then reinstall from scratch and live without the toggle buttons for now.

Android Project

Moving on from the Android UI designer for a moment, I also ran into problems with the wizard-generated Android project in that it’s naming the Android resource folders incorrectly.

AndroidResourceFolders

Notice that the folders under Resources (Drawable, Layout, Values) are all capitalized. That’s not supposed to be the case [ excuse the pun 🙂 ]. The Android platform doesn’t like that. Those are supposed to be all lower-case. I had to go through and manually rename them. Not ideal but not the end of the world.

BTW: Fixing those folder names had a nice side effect: It resolved the problem with the string resources. With those names fixed, the string resource values now display correctly on the device design surface (thanks to James Montemagno at Xamarin for his help on this one).

You can follow the steps I went through working things out on the Xamarin Forum.

iPhone Project

After working through all the Android stuff I setup all of the iOS pieces which include setting up a Mac as a build server. The setup process went pretty smoothly. I then ran the wizard to generate an iPhone Hello World app, did a build and immediately got 2 build errors and 1 build warning.

iPhoneBuildErrors

And with that I’m calling it a day.

I must admit, I expected an unchanged, wizard-generated project to be error free. 🙂

Keeping Perspective

To not blow things out of proportion, we want to keep in mind that none of the issues I’ve mentioned are show-stopping. They’re basically annoyances and all fairly easily worked around.

We don’t want to lose sight of the fact that Xamarin is solving a very hard problem. Android and iOS are incredibly different platforms with many of their own nuances and complexities. Then on top of that, Xamarin has to integrate into Visual Studio (a complex IDE) and interact with the iOS toolset running on a Mac. Many, many challenges to overcome.

Final Thoughts

Working in a brand new environment is always a bit stressful. For me, the best way to have that stressed relieved is for the environment to all work smoothly which didn’t quite happen in this case. That said, I have a workable environment and although I do need to apply some workarounds, they are all fairly easy to deal with.

I’ll dig back into things tomorrow.

Update: I’ve posted a follow up to this post.

Programming Stuff

Google Cloud Printing from Android

If you’ve worked with Google Cloud Printing then you know that much of the sample code out there that shows how to submit print jobs using Java or C# don’t work … frustrating to say the least.

After more pain then I’d care to admit, I finally got the code working so wanted to share it.

Below is the code to submit a PDF file for Printing (or storage on a Google Drive) using Google Cloud Printing from an Android device.

For a complete Android Studio project that shows how to interrogate the available printers, get the list of print jobs, and submit a print job download this project zip file.

public class GoogleCloudPrint {
 private static final String SERVICE_SOURCE_NAME = "your-apps-name-for-logging-purposes";
 public static final String GCP_BASE_URL_STRING =
  "https://www.google.com/cloudprint";
 private static final String SUBMIT_URL_STRING =
  GCP_BASE_URL_STRING + "/submit";
 private static final int DEFAULT_STREAMING_CHUNK_SIZE = 0;
 String mUsername;
 String mPassword;
 public GoogleCloudPrint(String username, String password) {
  mUsername = username;
  mPassword = password;
 }
 public void print(String printerId, String title, File documentFile, String mimeType) {
  try {
   byte[] documentBytes = getBytes(documentFile);
   String urlString = SUBMIT_URL_STRING +
    "?output=json" +
    "&printerid=" + printerId +
    "&contentType=" + mimeType +
    "&title=" + title ;
   // Open connection and configure for POST with streaming writes
   HttpsURLConnection connection = createConnection(urlString);
   connection.setDoOutput(true);
   connection.setChunkedStreamingMode(DEFAULT_STREAMING_CHUNK_SIZE);
   // Create the multi-part form data prefix and suffix
   // include filename value in prefix
   String queryPrefix = String.format(
    "------CloudPrintFormBoundaryqeq6g6ncj5v7\r\n" +
    "Content-Disposition: form-data; name=\"content\"; filename=\"%s\"\r\n" +
    "\r\n", title);
   String querySuffix = "\r\n------CloudPrintFormBoundaryqeq6g6ncj5v7--";
   // Encoide prefix and suffix and determine total content length
   byte[] queryPrefixBytes = EncodingUtils.getAsciiBytes(queryPrefix);
   byte[] querySuffixBytes = EncodingUtils.getAsciiBytes(querySuffix);
   int contentLength = queryPrefixBytes.length + documentBytes.length + querySuffixBytes.length;
   // Add headers for multipart form data and length
   connection.addRequestProperty("Content-Type", 
    "multipart/form-data; boundary=----CloudPrintFormBoundaryqeq6g6ncj5v7");
   connection.addRequestProperty("Content-Length", Integer.toString(contentLength));
   // Write the document to server wrapped as multipart form data
   writePrintBody(connection, queryPrefixBytes, documentBytes, querySuffixBytes);
   // Write results to log
   InputStream inStream = connection.getInputStream();
  } catch (Exception e) {
   e.printStackTrace();
  }
 }
 private HttpsURLConnection createConnection(String urlString) throws IOException {
  String auth = retrieveAuthToken(mUsername, mPassword);
  URL url = new URL(urlString);
  HttpsURLConnection connection = (HttpsURLConnection) url.openConnection();
  connection.addRequestProperty("X-CloudPrint-Proxy", SERVICE_SOURCE_NAME);
  connection.addRequestProperty("Authorization", "GoogleLogin auth=" + auth);
  return connection;
 }
 private void writePrintBody(HttpsURLConnection connection, byte[] prefixBytes,
  byte[] documentByes, byte[] suffixBytes) throws IOException {
  OutputStream outStream = new BufferedOutputStream(connection.getOutputStream());
  outStream.write(prefixBytes, 0, prefixBytes.length);
  outStream.write(documentByes, 0, documentByes.length);
  outStream.write(suffixBytes, 0, suffixBytes.length);
  outStream.flush();
  outStream.close();
 }
private String retrieveAuthToken(String userId, String password) {
  final String AUTHORIZE_URL_FORMAT = "https://www.google.com/accounts/ClientLogin" +
   "?accountType=HOSTED_OR_GOOGLE" +
   "&Email=%s" +
   "&Passwd=%s" +
   "&service=cloudprint" +
   "&source=" + SERVICE_SOURCE_NAME;
  String authorizeURL = String.format(AUTHORIZE_URL_FORMAT, userId, password);
  String auth = "NOT_SET";
  InputStream inStream = null;
  BufferedReader reader = null;
  try {
   URL url = new URL(authorizeURL);
   HttpsURLConnection connection = (HttpsURLConnection) url.openConnection();
   inStream = connection.getInputStream();
   reader = new BufferedReader(new InputStreamReader(inStream));
   String buffer;
   StringBuilder stringBuilder = new StringBuilder();
   while ((buffer = reader.readLine()) != null) {
    String[] parts = buffer.split("=");
    if ("Auth".equalsIgnoreCase(parts[0])) {
      auth = parts[1];
      break;
    }
   }
  } catch (Exception e) {
   e.printStackTrace();
  } finally {
   try {
    if (reader != null)
     reader.close();
    if (inStream != null)
     inStream.close();
   } catch (Exception e) {
    e.printStackTrace();
   }
  }
  return auth;
 }
 private byte[] getBytes(File documentFile) {
  byte[] bytes = null;
  try {
   FileInputStream inputStream = new FileInputStream(documentFile);
   ByteArrayOutputStream baos = new ByteArrayOutputStream();
   byte[] buffer = new byte[4096];
   int n = inputStream.read(buffer);
   while (n >= 0) {
    baos.write(buffer, 0, n);
    n = inputStream.read(buffer);
   }
   inputStream.close();
   baos.flush();
   bytes = baos.toByteArray();
  } catch (Exception e) {
   e.printStackTrace();
  }
  return bytes;
 }
}